Last December, I had the idea to keep an advent calendar of sorts for learning new software engineering concepts. I would look up different things that I haven’t really had the chance to learn about in depth, things that I’ve only had to touch upon lightly to build projects, and read about them for an hour or so. This was my way of filling some gaps in my core knowledge. I kept up pretty well at first; I read all about HTTP versions, caching, web accessibility, and a bunch of other things. Not too long after, however, I slacked off, and I started to forget about my Google Sheets every other day.
Halfway through December, I came up with another plan: I made a Notion database with a bunch of columns titled with categories of things I’d like to do consistently, such as learning something new or solving a Leetcode problem, and rows of dates. I would fill in the cells with a description or a count representing the “units”, such as “learned about the context API” in the learning column or “2” in the Leetcode column. This offered a much better workflow: I already used Notion for other things, so this tracker was somewhat always within reach. I also kept a column for journalling; since I couldn’t make time for proper journalling every day, even though I wanted to make it a habit, I gave myself the space to write a line or two about how my day went.
It just so happens that I am particularly interested in good user interface
design, and this tracker with just plain rows and columns wasn’t really the most
appealing thing to look at. It was a bunch of numbers that did very little to
inspire or convey a proper sense of my progress or momentum. So I started to
devise other ways to track my life, and I think I was looking at my GitHub
contribution chart, when it occurred to me that this was perfect: I needed a
contribution chart for my life. I’d set “units” – things I want to make a habit out
of, log the number of times I did them in a day, and visualize my daily
contributions in a GitHub style chart. I ran npx create-next-app@latest and
got to work.
I chose Next.js because I wanted initial page load times to be fast, and Next.js 15 with Vercel is unmatched for leveraging the power of React server components. The user should be able to access their logger in an instant, log their daily units, and get on with their day. Compiling the JSX for 365 little squares on the browser, each of them being interactive, would have definitely slowed down the client side rendering, as I’ve also confirmed during development. Plus, being a full stack framework, Next.js allowed me to write all my frontend and backend logic in one codebase, and for a small project like this, this was an important feature.
For the database, I had a bunch of options to choose from, and since I’d mostly be making simple queries, I decided to start with Firebase Firestore, because the free tier is generous enough for this case. Vercel offers its own managed PostgreSQL, but Firebase offered the flexibility that is unique to NoSQL databases, and being an indie developer, I liked that I could make changes to the data format on the fly, without having to run database migrations every time I thought of something new. I’ve discussed my predisposition with NoSQL databases in more detail in my last blog post here.
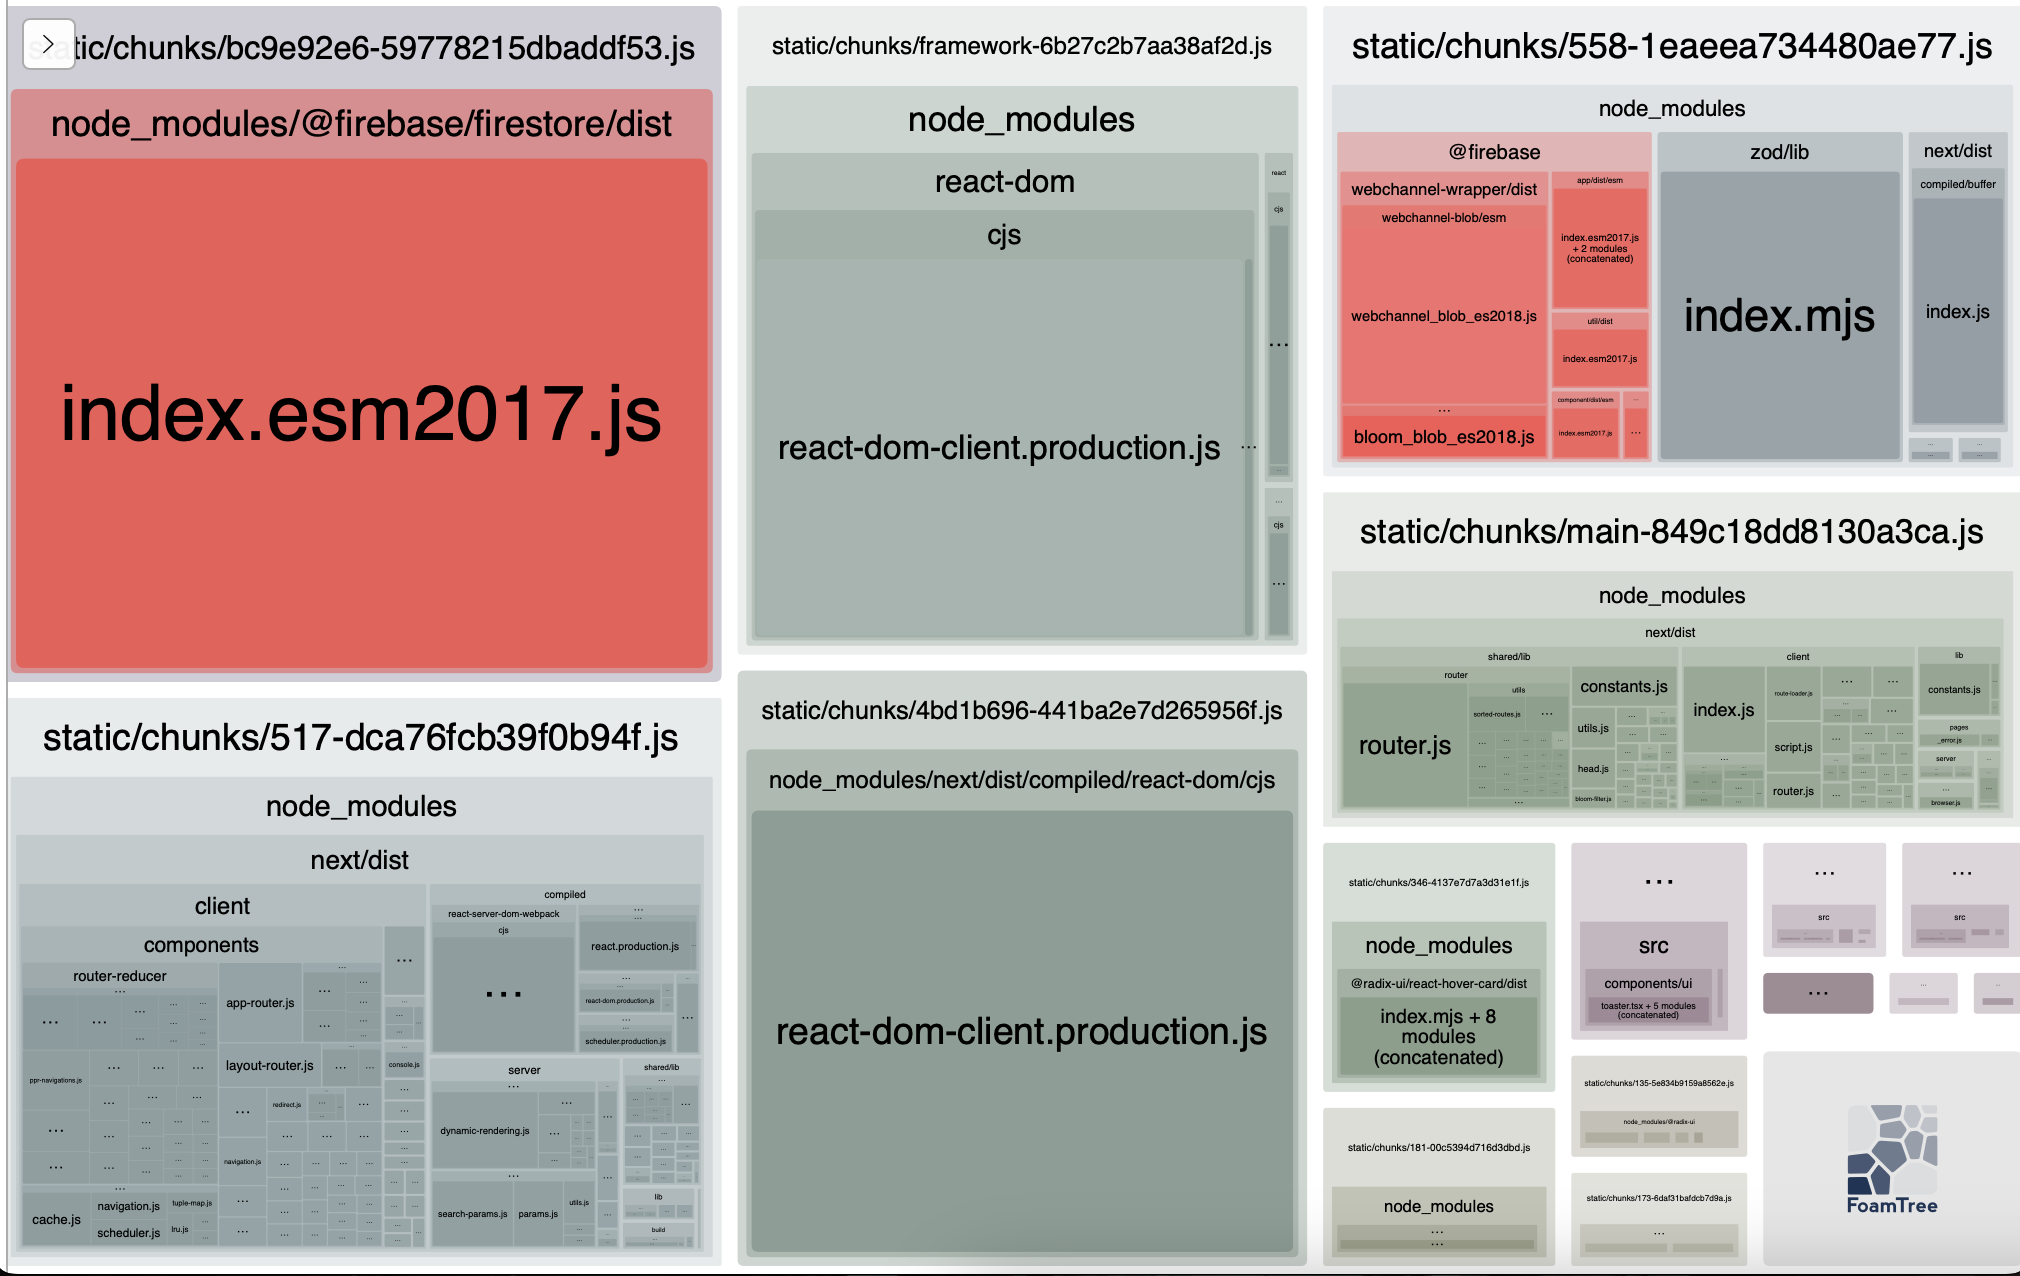
However, Firebase had two main issues. First, it is huge! Using Next.js’s bundle analyzer, I could see that in the 346.99 KB (gzipped) bundle served to the client, 230.76 KB was taken up by Firebase! Even though I was only communicating with Firebase on the server, since I was using the client SDK, it was still included in the bundle sent to the client. This was undesirable to say the least, and since I was prioritizing faster initial page loads, this had to be fixed. I looked online for potential workarounds, and I saw some Webpack tweaks. However, the cleanest solution turned out to be using the Firebase Admin SDK. Because there was no need for Firebase on the client side, I could offload all of it to the server, and on top of that, the Admin SDK was much smaller in size. Running the bundle analyzer after the refactoring showed 0 KB taken up by Firebase in the client bundle – a huge win!
Secondly, Firestore is a little slow. Google apparently does not offer SLAs on latency, and measurements show a staggering 1500ms RTT for a Firestore database deployed in the europe-west
region. For this app, maybe that would have been fine, but a latency of over 1 second
for one query is poor regardless. When the user performed an action, there was a
palpable delay between the time when the action was performed and when the UI updated.
It felt a little odd, too, since, from the user’s perspective, sometimes they were
just incrementing a counter. To alleviate this, I implemented optimistic updates using
React 19’s new useOptimistic and useTransition hooks. This way, the local state
is updated immediately, as soon as the user performs an action, and the database
call is made in the background. If the mutation fails, the useOptimistic hook is
initialized to facilitate easily rolling back the local state.
Still, there were some cases where optimistic updates could not be utilized; for example, during user authentication. The user would have to wait for their request to reach the server, then for the OAuth provider’s response, and then finally while Firestore is queried to check if they are a new or a registered user. This was an issue, because it brought a lot of delay to the authentication flow, and given that the login page is the first thing that users see, a slow login doesn’t really give the best impression of an optimized app. To alleviate just the slow login times, I brought in a persistent Redis instance to hold a list of all registered users. Since Redis has a much lower read latency, usually about 10ms, registered users are able to log in much faster. If the user’s email exists in Redis, Firestore is not queried further, and they are directly sent to the home page.
I was initially using redis, the Node.js client module, to connect to a Redis
instance deployed on Redis cloud. But this was not appropriate for a serverless
environment, since the module is designed to maintain an active connection to
Redis, and Vercel, being a serverless hosting provider, times out functions at
10s. Redis also implements its own Redis Serialization Protocol (RESP), so I
couldn’t directly interact with Redis using REST APIs. As a workaround, I
switched to a managed Redis instance from Upstash, which acts as an intermediary
and allows for interaction with the database using a module that uses the
REST protocol. This meant that my app wouldn’t have any long running functions,
and I wouldn’t max out my usage limits on my free plan! I also made sure to
deploy the Redis instance in the same AWS region as my Next.js app, iad1, to
bring down the RTT between the server and the database. However, the benefits of
doing this are unclear, since they are still communicating over the internet. If
we could make Redis and the server communicate within a VPC, using private IPs,
it would favor latency, but doing this requires a paid plan on Upstash, so I had
to forego this additional setup.
Inside the app, components that need to fetch data are composed in two layers: a
parent (server) component that fetches the data and passes the serialized data
as props to the child (client) component. This offloads data fetching to the
server, which translates to much lower FCP and LCP times. Furthermore, almost
every component is wrapped by React.memo, while functions and states use
useMemo and useCallback wherever appropriate. This made a huge difference –
using the React Scan module, I could see the rendering frequency of different components
before and after memoization was implemented, and unnecessary rerenders are
almost completely eliminated.
Except perhaps between pages during navigation – an unfortunate downside of
using React server components. Every time a user navigates between pages using
the Link component from next/link, the browser fetches the React Server Component payload from the server, since each page contains dynamic content, and this makes navigation
a little slower than desirable. Using the browser’s back/forward buttons, which uses
the isHistoryNavigation property, feels much faster. Furthermore, my Link components
wrap lucide-react icons, and Link component only does prefetching if it wraps a string or an anchor tag, so I’m missing out on prefetching benefits as well.
Perhaps the worst offender in terms of performance was probably the chart. It is
a mammoth of 356 Dot components, and in my first iteration, each of them were
wrapped by a shadcn <HoverCard> component, which meant that each of those 365
dots registered their own event listeners for the mouse move event. This was a drag, and it made the chart rendering incredibly slow. To work around this, I wrapped the
entire chart in one <HoverCard> component, so that there would be only one
event listener for the whole component, and tried to pass props to <HoverCard>
to position it accordingly. However, this component, built on top of Radix UI,
is designed for static positioning, and it was impossible to position it
properly without weird shifts or animation issues. I ended up getting rid of
<HoverCard>, opting instead to use my own version of it, which could be
positioned more flexibly. The event listener emits the mouse’s position, and a
callback function determines which <Dot> is being hovered based on the <Dot>
and cursor’s relative positions. This way, I had the best of both worlds: a nice
looking card, without the performance hit. Additionally, I marked the chart and
the logger options components with separate suspense boundaries, so that they
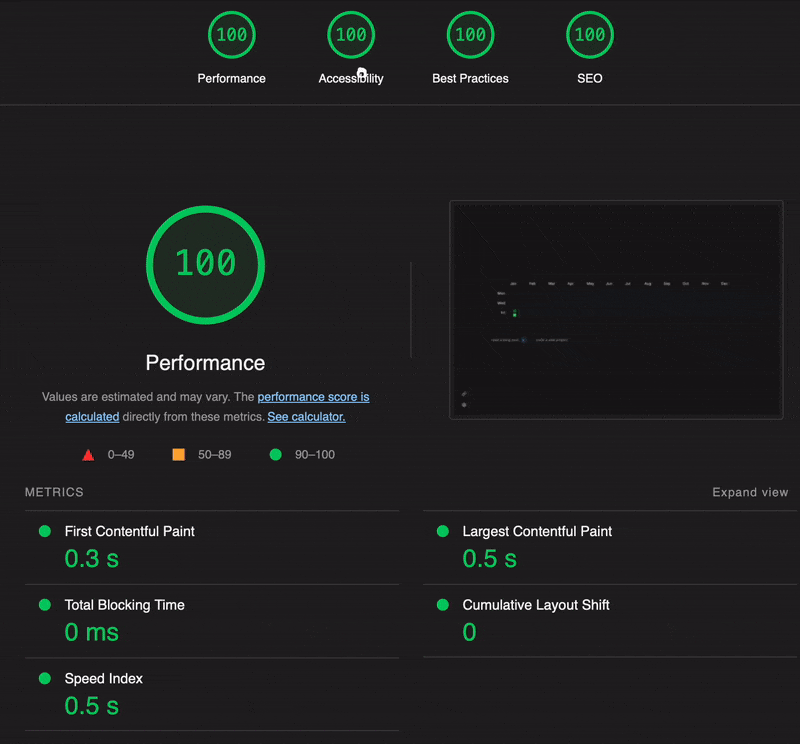
could be loaded in parallel, which brought the LCP down to 0.5s.
My next steps would be to speed up data fetching and client side navigation, and I’m still figuring these out. For speeding up writes, I’m considering using another Redis instance as a cache layer over Firebase. I could use an EC2 instance running 24/7 to listen to Redis Keyspace Notifications, and trigger an AWS Lambda function whenever a write is performed. The data would be written to Redis first, and then written back to Firestore in the background. Although speeding up reads is more urgent, I’m still deliberating on a cost-effective architectural solution.
Tracker is live – try it out now on tracker.zzzzion.com!